Arduino Uno control the RGB LED in Rust
Lately I got myself a Arduino Uno compatible device. Since I do not really like to do my stuff in C and to avoid having all the very cool tutorial snippets just for free, I decided to start implement a beginners project in rust.
The final implementation can be found here
Project goal
I am using one of the most simple tutorials and bring it a bit further by implementing a slow color changing effect on a LED using the PWM Pins 6(Red), 5(Green), 3(Blue).
In the end we want to have rust code fading colors on the LED continuously.
As library / hardware-abstraction-layer, we are using the avr-hal
Bootstrapping the project
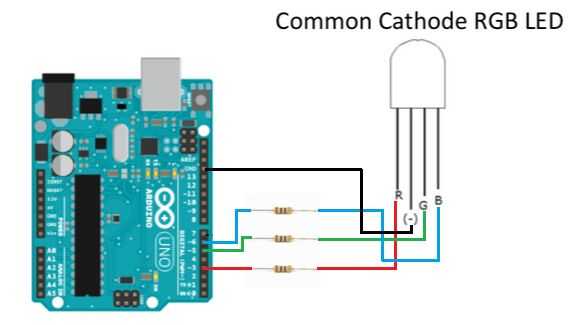
Setting up the arduino like it is described here.
The only importance difference is, here we are using different pins (3, 5, 6).
If you want to see my source, you may want to have a look at
the PDF I used.
I am using the current rust v1.73.0-nightly.
Setting up avr-hal quite strait forward as described in the repo:
- Installing the dependencies
pacman -S avr-gcc avr-gdb arduino-avr-core avrdude libudev0-shim - Installing ravedude
cargo +stable install ravedude - Initializing the repos via the handy template
cargo generate --git https://github.com/Rahix/avr-hal-template.git - Test
cargo run # the LED 1 onboard should start to blink
Get timers, PINs and PWM to encode colors on the LED
Let’s tinker around a bit with how to access the PINs using the different Timers.
- Pin PD5 and PD6 are sharing the same Timer Timer0PWM
- Pin3 is using a different one namely Timer2PWM
Knowing these internals we can implement a very low level solution operating directly on the PWM Pulses on the Timers. Found in this issue of the project.
let tc0 = dp.TC0;
let tc2 = dp.TC2;
tc0.tccr0a.write(|w| w.wgm0().bits(0b01).com0a().match_clear());
tc0.tccr0b.write(|w| w.wgm02().bit(true).cs0().prescale_64());
tc2.tccr2a.write(|w| w.wgm2().pwm_fast().com2a().match_clear().com2b().match_clear());
tc2.tccr2b.write(|w| w.cs2().prescale_1024());

pins.d5.into_output();
pins.d6.into_output();
pins.d3.into_output();

loop {
    for duty in 0u8..=255u8 {
        ufmt::uwriteln!(&mut serial, "Duty: {}", duty).void_unwrap();
        tc0.ocr0a.write(|w| w.bits(duty));
        tc0.ocr0b.write(|w| w.bits(duty));
        tc2.ocr2a.write(|w| w.bits(duty));
        arduino_hal::delay_ms(20);
    }
}
But this code does (at least for me) do not spark joy. It does work (and may be good if you really want to have to see what you’re doing) but why would we use rust here if we just do not use any neat abstractions but pumping bits directly into things called tc0.ocr?? There must be something with more fun to use!
Using simple_pwm
Happily the exact HAL we’re using has neatly typed abstractions around the different Timers,
Pins and Pulse with modulations. Named with the name simple_pwm.
Using this, the code looks like the following
let dp = arduino_hal::Peripherals::take().unwrap();
let pins = arduino_hal::pins!(dp);
let mut serial = arduino_hal::default_serial!(dp, pins, 57600);

ufmt::uwriteln!(&mut serial, "Hello from Arduino!").void_unwrap();

let mut pwm_timer0 = arduino_hal::simple_pwm::Timer0Pwm::new(
    dp.TC0,
    arduino_hal::simple_pwm::Prescaler::Prescale64,
);
let mut pwm_timer2 = arduino_hal::simple_pwm::Timer2Pwm::new(
    dp.TC2,
    arduino_hal::simple_pwm::Prescaler::Prescale64,
);

let mut red = pins.d6.into_output().into_pwm(&mut pwm_timer0);
let mut green = pins.d5.into_output().into_pwm(&pwm_timer0);
let mut blue = pins.d3.into_output().into_pwm(&mut pwm_timer2);

red.enable();
green.enable();
blue.enable();

loop {
    for duty in 0..255 {
        red.set_duty(duty);
        green.set_duty(duty);
        blue.set_duty(duty);
    }
}
Way better! And the best thing: The origins and configurations of the pins are very neat abstracted via rust types:
let mut red: Pin<PwmOutPut<Timer0Pwm>, PD6> = pins.d6.into_output().into_pwm(&mut pwm_timer0);
Since the type system of rust is amazing and this library seems to be well crafted into it, we may come to this later, since this might become handy.
Implementing the sliding effect
The sliding effect for each Color or each Pin of the LED knows two directions:
- either the current value (or duty) is higher than the target
- or we have to increase the value
let current_duty = red.get_duty();
if current_duty < duty {
    for d in (current_duty..duty) {
        red.set_duty(d);
        arduino_hal::delay_ms(10);
    }
} else {
    for d in (duty..current_duty).rev() {
        red.set_duty(duty);
        arduino_hal::delay_ms(10);
    }
}
Since we have no std and no alloc on the Uno, there is no Box, to abstract the two types:
Range<u8> and Rev<Range<u8>>, leading to this quite complicated if else.
This leads to a somewhat promising implementation
static sequence: [[u8; 3]; 3] = [
    [17, 130, 75],
    [33, 13, 11],
    [136, 170, 199]];

...

loop {
    for [r, g, b] in sequence {

        let current_duty = red.get_duty();
        if current_duty < r {
            for d in (current_duty..r) {
                red.set_duty(d);
                arduino_hal::delay_ms(10);
            }
        } else {
            for d in (r..current_duty).rev() {
                red.set_duty(d);
                arduino_hal::delay_ms(10);
            }
        }

        let current_duty = green.get_duty();
        if current_duty < g {
            for d in (current_duty..g) {
                green.set_duty(d);
                arduino_hal::delay_ms(10);
            }
        } else {
            for d in (g..current_duty).rev() {
                green.set_duty(d);
                arduino_hal::delay_ms(10);
            }
        }
        let current_duty = blue.get_duty();
        if current_duty < g {
            for d in (current_duty..b) {
                blue.set_duty(d);
                arduino_hal::delay_ms(10);
            }
        } else {
            for d in (b..current_duty).rev() {
                blue.set_duty(d);
                arduino_hal::delay_ms(10);
            }
    }

}
I mean that works, but there is so much code duplication, it hurts my eyes, and if there is an error, there is no way to properly see it, or it’s impact, it just blurs in front of the eyes.
Buit how to implement a generalisation? Looking at the specs of the arduino PWM is not used on every
PIN and even the timers have different interfaces, no way we can just use set_duty or get_duty on
arbitrary PDs. This is now where the type abstraction of the HAL kicks in and becomes a huge advantage!
The trait Slider
What we want to have is something like that: red.slide(200), everything else should be abstracted out of
our way. Inside the loop the information how it gets slided is not useful at all.
trait Slider {
    fn slide(&mut self, duty: u8);
}
Let’s first have a look at the documentation if we can find a type or trait where we have the needed functions available.
The trait PwmPinOps looks promising, but how to get the right implementation for TC. Since it is tightly bound the timer, the Pin and the PWM, we need a way to abstract over all of them. Otherwise, we would have to write a trait for every configuration we have.
Luckily an almost valid type definition was found by Martin Atkins in the source code of the project.
impl<TC, PIN: PwmPinOps<TC>> Pin<mode::PwmOutput<TC>, PIN>{}
This does not know anything about the internal type for duty. But since we know it is u8 the
implementation of our Slider is easy to centralize.
impl<TC, PIN: PwmPinOps<TC, Duty = u8>> Slider for Pin<mode::PwmOutput<TC>, PIN> {
    fn slide(&mut self, duty: u8) {
        let current_duty = self.get_duty();
        if current_duty < duty {
            for d in (current_duty..duty) {
                self.set_duty(d););
                arduino_hal::delay_ms(10);
            }
        } else {
            for d in (duty..current_duty).rev() {
                self.set_duty(duty);
                arduino_hal::delay_ms(10);
            }
        }
    }
}
And tadaa the trait is implemented for every configuration using the PwmPinOps in our configuration
loop {
    for [r, g, b] in sequence {
        red.slide(r);
        green.slide(g);
        blue.slide(b);
    }
}